최종 작성 날짜 : 2022-05-05 21:10:35 +0900
Coroutine
코루틴이란?
코루틴(Coroutine) 자체는 코틀린에 국한된 개념이 아닌 예전부터 알려진 개념이다. 코루틴의 이름은 Co + Routine이 합쳐져 불리는 것으로, Co는 together의 의미를 가지고 있으며 Routine은 함수라고 생각하면 된다. 즉, 코루틴은 routine들이 서로 상호작용하면서 실행되고, 실행을 일시정지(suspend)하고 다시 진행(resume)할 수 있는 비선점형 멀티태스킹을 위한 서브루틴(subroutine)을 의미한다.
비선점형 멀티태스킹
CPU를 사용하고 있는 스레드가 작업을 다 완료해야지만 운영체제에서 해당 자원을 회수할 수 있는 것을 의미한다.
코루틴의 목적
코루틴의 목적은 간단하다.
- 메인 스레드를 차단하기에는 너무 오래 걸리는 작업을 대신 처리하기 위함이다.
- 일반적인 함수에 suspend 키워드와 withContext를 이용해 코루틴의 실행을 다른 스레드로 쉽게 옮길 수 있다.
suspend 키워드를 입력함으로써 코루틴 내에서만 해당 함수를 호출하도록 강제할 수 있다.
구조적 동시성 (Structured concurrency)
코루틴은 구조적 동시성의 원칙을 따른다. 하나의 부모 Scope안에 자식 Scope를 생성할 수 있는데, 자식 Scope에 있는 코드가 모두 실행이 완료(취소도 포함됨)되어야만 부모 Scope가 완료된다는 것이다. 이렇게 구조적 동시성을 지킨 잘 짜여진 코드는 관련된 모든 자식 코루틴이 취소되므로 작업 누수(Work leak)가 발생하지 않는다는 것이다. 작업 누수라는 것은 메모리 누수와 비슷하지만, 코루틴 자체를 잃어버리게 됨으로써 메모리 뿐만 아니라 CPU, Disk 등에도 누수가 발생하는 것을 의미한다.
코루틴과 스레드의 차이
코루틴은 다른 코드들과 동시에 실행된다는 점(비동기)에서 스레드랑 개념적으로는 비슷하지만 엄연히 다르다.
스레드는 운영체제에서 관리(선점형)하지만 코루틴은 프로그램 코드에서 관리한다. 또한, 스레드에서 작성된 코드는 해당 스레드에서만 실행이 가능하지만, 코루틴은 작성된 코드가 다른 스레드에서 실행이 가능하다.
Thread 사용 시
코드
1
2
3
4
5
6
7
8
9
10
11
12
13
14
15
16
17
  import kotlin.concurrent.thread

  fun log(message: String) = println("[${Thread.currentThread().name}] $message")

  fun main() {
      runThreads()
  }

  fun runThreads() {
      for (i in 1..5) {
          thread {
              log("$i 번째 스레드")
              Thread.sleep(3000)
              log("$i 번째 스레드 종료")
          }
      }
  }
결과
1
2
3
4
5
6
7
8
9
10
  [Thread-3] 3 번째 스레드
  [Thread-4] 4 번째 스레드
  [Thread-2] 2 번째 스레드
  [Thread-1] 1 번째 스레드
  [Thread-5] 5 번째 스레드
  [Thread-1] 1 번째 스레드 종료
  [Thread-3] 3 번째 스레드 종료
  [Thread-2] 2 번째 스레드 종료
  [Thread-5] 5 번째 스레드 종료
  [Thread-4] 4 번째 스레드 종료
위 결과에서 스레드 시작과 종료가 동일한 스레드에서 발생하는 것을 볼 수 있다.
Coroutine 사용 시
코드
1
2
3
4
5
6
7
8
9
10
11
12
13
14
15
16
17
18
  import kotlinx.coroutines.*

  fun log(message: String) = println("[${Thread.currentThread().name}] $message")

  fun main() = runBlocking {
      runCoroutine()
      delay(5000)
  }

  suspend fun runCoroutine() {
      for (i in 1..5) {
          CoroutineScope(Dispatchers.Default).launch {
              log("$i 번째 코루틴")
              delay(3000)
              log("$i 번째 코루틴 종료")
          }
      }
  }
결과
1
2
3
4
5
6
7
8
9
10
  [DefaultDispatcher-worker-1] 1 번째 코루틴
  [DefaultDispatcher-worker-2] 2 번째 코루틴
  [DefaultDispatcher-worker-3] 3 번째 코루틴
  [DefaultDispatcher-worker-3] 4 번째 코루틴
  [DefaultDispatcher-worker-3] 5 번째 코루틴
  [DefaultDispatcher-worker-1] 2 번째 코루틴 종료
  [DefaultDispatcher-worker-3] 1 번째 코루틴 종료
  [DefaultDispatcher-worker-3] 3 번째 코루틴 종료
  [DefaultDispatcher-worker-3] 4 번째 코루틴 종료
  [DefaultDispatcher-worker-3] 5 번째 코루틴 종료
위 결과를 보면 시작과 종료가 다른 스레드에서 발생한 것을 볼 수 있다.
코루틴의 장점
코루틴을 사용하면 여러가지 이점이 있는데, 네트워크 통신을 예로들면 스레드는 통신이 완료됐을 때 결괏값을 콜백함수를 통해 전달해야한다. 하지만, 코루틴은 일시정지가 가능하므로 통신이 완료됐을 때 일반함수처럼 결괏값을 반환받아 다음 코드로 전달해 실행할 수 있다. 스레드에서 UI를 업데이트할 수 없으므로 invokeLater를 이용해 업데이트를 다른 스레드에서 할 수 있도록 했다. 아래 예시를 참고하자.
Thread 사용 시
코드
1
2
3
4
5
6
7
8
9
10
11
12
13
14
15
16
17
18
19
20
21
22
23
24
25
26
  import kotlinx.coroutines.runBlocking
  import javax.swing.SwingUtilities
  import kotlin.concurrent.thread

  fun log(message: String) = println("[${Thread.currentThread().name}] $message")

  fun loadImageThread(updateUI: (String) -> Unit) {
      thread {
          log("네트워크 통신중")
          Thread.sleep(3000) // 네트워크 통신 가정
          updateUI("이미지를 가져왔습니다.") // UI 업데이트
      }
  }

  fun main() = runBlocking {
      loadImageThread { // 콜백함수 등록
          SwingUtilities.invokeLater {
              updateUI(it)
          }
      }
      log("main은 계속 실행됨")
  }

  fun updateUI(message: String) {
      log(message)
  }
결과
1
2
3
  [main] main은 계속 실행됨
  [Thread-1] 네트워크 통신중
  [AWT-EventQueue-0] 이미지를 가져왔습니다.
Coroutine 사용 시
코드
1
2
3
4
5
6
7
8
9
10
11
12
13
14
15
16
17
18
19
20
21
22
23
  import kotlinx.coroutines.*

  fun log(message: String) = println("[${Thread.currentThread().name}] $message")

  suspend fun loadImageCoroutine(): String {
      withContext(Dispatchers.IO) {
          log("네트워크 통신중")
          delay(3000) // 네트워크 통신 가정
      }
      return "이미지를 불러왔습니다."
  }

  fun main() = runBlocking {
      launch {
          val message = loadImageCoroutine()
          updateUI(message)
      }
      log("main은 계속 실행됨")
  }

  fun updateUI(message: String) {
      log(message)
  }
결과
1
2
3
  [main] main은 계속 실행됨
  [DefaultDispatcher-worker-1] 네트워크 통신중
  [main] 이미지를 불러왔습니다.
코루틴 관련 변수들 정리
1. CoroutineScope vs coroutineScope
CoroutineScope과 coroutineScope은 C(대문자)와 c(소문자)의 한글자 차이지만 그 차이는 크다. 먼저 코드를 살펴보고 차이를 확인해보자.
CoroutineScope
코드
1
2
3
4
5
6
7
8
9
10
11
12
13
14
15
16
17
18
19
20
21
22
  import kotlinx.coroutines.*

  fun log(message: String) = println("[${Thread.currentThread().name}] $message")

  fun main() = runBlocking {
      var count = 0
      CoroutineScope(Dispatchers.Default).launch {
          count = createNewCoroutine()
          log("result : $count")
      }.join()
  }

  suspend fun createNewCoroutine(): Int {
      var count = 0
      CoroutineScope(Dispatchers.Default).launch {
          for (i in 1..20) {
              count++
              delay(10)
          }
      }
      return count
  }
결과
1
  [DefaultDispatcher-worker-1] result : 0
coroutineScope
코드
1
2
3
4
5
6
7
8
9
10
11
12
13
14
15
16
17
18
19
20
  import kotlinx.coroutines.*

  fun main() = runBlocking {
      var count = 0
      CoroutineScope(Dispatchers.Default).launch {
          count = createNewCoroutine()
          log("result : $count")
      }.join()
  }

  suspend fun createNewCoroutine(): Int {
      var count = 0
      coroutineScope {
          for (i in 1..20) {
              count++
              delay(10)
          }
      }
      return count
  }
결과
1
  [DefaultDispatcher-worker-1] result : 20
위 코드에서 우리가 예상한 결괏값은 20이지만, 두 개의 결과는 다른것을 확인할 수 있다. CoroutineScope과 coroutineScope에 대한 설명은 아래와 같다.
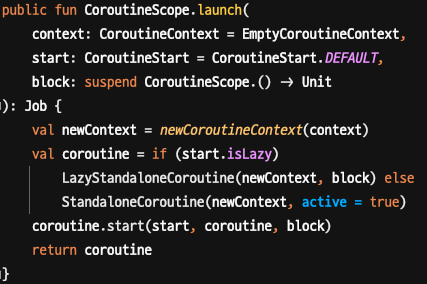
- CoroutineScope
- 완전 새로운 코루틴을 위한 범위(Scope)를 코루틴 빌더(
launch,async)와Dispatcher를 이용해 정의할 수 있다. coroutineContext를 새로 생성해서 범위 안에 있는 다른 코루틴들을 모두 취소할 수도 있다.CoroutineScope를 이용해 코루틴을 생성하면StandaloneCoroutine객체가 생성된다.- 정확히는 코루틴 빌더 (launch)에 의해 새로운 코루틴이 생성되는 것이다.
![image]()
![image]()
- 완전 새로운 코루틴을 위한 범위(Scope)를 코루틴 빌더(
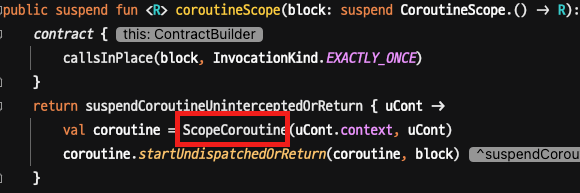
- coroutineScope
- 범위(Scope)내에서 또다른 범위(Scope)를 실행하기 위해 사용하는
Scope Builder이다. - 부모 Scope에 있는
coroutineContext를 상속받아coroutineContext의job을 재정의하며 이 scope안에 있는 다른 코루틴들을 모두 취소할 수도 있다. coroutineScope를 이용해 코루틴을 생성하면ScopeCoroutine객체가 생성된다.![image]()
- 범위(Scope)내에서 또다른 범위(Scope)를 실행하기 위해 사용하는

CoroutineScope은 부모 코루틴 범위에 있더라도 부모 코루틴과 상관없는 아예 새로운 코루틴을 생성하기 때문에 일시정지가 되지 않고 바로 값을 반환해서 결괏값이 0이 출력되었으며, coroutineScope은 부모 코루틴의 범위 내에 있으므로 일시정지되어 작업을 수행한 후에 값을 반환하게 되므로 20이 출력되었다.
2. coroutineContext
coroutineContext는 코루틴 빌더를 이용해 생성될 때 같이 생성되는 context이다. 이 coroutineContext를 이용해 자식 코루틴들을 관리할 수 있다. 위에서 언급한 것처럼 coroutineScope를 이용해 자식 코루틴을 만들게 되면 자식 코루틴은 부모 코루틴의 coroutineContext를 상속받아 사용한다. 일반적으로 이 context에 특별한 목적을 제외하고는 직접 접근하는 것을 추천하지 않는다.
3. Scope builder
coroutineScope 또는 runBlocking을 이용해 자신만의 scope을 지정할 수 있으며 scope 내부에 있는 자식 코루틴들이 끝날때까지 완료되지 않는다.
coroutineScope과 runBlocking이 둘 다 Scope builder이지만 둘의 차이점은 명확하다. coroutineScope은 현재 실행중인 스레드를 차단하지 않고 코루틴을 실행하지만, runBlocking은 현재 실행중인 스레드를 차단한 후 자식 코루틴들이 다 완료될 때까지 기다리고, 모두 완료가 되면 차단된 스레드를 다시 실행한다.
콘솔로 코루틴을 테스트할 때 main함수에 runBlocking을 설정하는 이유는 메인 스레드를 차단하지 않게 되면 코루틴이 실행되어도 프로그램이 종료되어 코루틴을 테스트할 수 없게 된다.
또한, Scope builder안에 코루틴 빌더를 사용하여 부모가 있는 여러개의 코루틴을 생성할 수 있다.
코드
1
2
3
4
5
6
7
8
9
10
11
12
13
14
15
16
17
18
19
20
fun main() = runBlocking {
    val time = measureTimeMillis {
        doSomething()
    }
    println("main end [$time ms]")
}

suspend fun doSomething() {
    coroutineScope {
        launch {
            delay(2000)
            println("launch 2")
        }
        launch {
            delay(1000)
            println("launch 1")
        }
        println("coroutineScope")
    }
}
결과
1
2
3
4
coroutineScope
launch 1
launch 2
main end [2035 ms]
4. Coroutine builder
코루틴 빌더를 이용해 새로운 코루틴을 생성할 수 있으며, 코루틴 빌더에는 launch와 async 등이 있다. 이 코루틴 빌더를 이용해 새로운 코루틴을 생성할 수 있으며 독립적으로 작동한다.
3. Scope builder의 예시를 보면 알 수 있듯이, launch코루틴 빌더를 이용해 독립적으로 코루틴을 시작하고, coroutineScope에서는 자식 코루틴들이 모두 종료될 때까지 기다리게 되므로 처음 coroutineScope을 출력한 후 1초후에 launch 1이 출력되고, 다시 또 1초후에 launch 2가 호출된다. 그리고 모든 자식 코루틴이 종료됐으므로 coroutineScope이 종료된 후 메인 함수로 돌아가 main end를 호출하게 된다.
launch와 async의 차이점은 반환값에 있다. launch는 Job이라는 객체로 반환을 하지만, async는 함수를 실행한 결괏값을 반환받을 수 있다. 즉, 함수 실행시 반환값을 받아야하는 경우 async로 코루틴을 생성하고 await 메소드로 결괏값을 받을 때까지 일시정지 상태를 유지한다.
5. Dispatchers
코루틴이 실행되는 위치를 지정할 수 있으며, Main, IO, Default가 존재한다. 기본적으로 안드로이드에서는 기본적으로 코루틴을 생성할 때 Dispatchers.Main을 사용하고 실행 위치를 변경해야할 때 withContext를 이용해 실행 위치를 변경한다. 각각 언제 사용해야되는지에 대해 살펴보면 아래와 같다.
- Dispatchers.Main
- UI와 상호작용해야할 때
- suspend 함수를 호출할 때
- UI 관련 함수를 호출할 때
- LiveData를 업데이트할 때
- Dispatchers.IO
- 디스크 또는 네트워크 IO를 처리할 때
- 데이터베이스
- 파일 입/출력
- 네트워크
- Dispatchers.Default
- CPU를 많이 사용하는 작업을 처리할 때
- List 정렬
- JSON 파싱
- DiffUtils
코드
1
2
3
4
5
6
7
8
9
10
11
12
13
14
15
16
17
18
19
20
21
22
23
24
25
26
import kotlinx.coroutines.*
import kotlin.system.measureTimeMillis

fun log(message: String) = println("[${Thread.currentThread().name}] $message")

fun main() = runBlocking {
    log("main start")
    val time = measureTimeMillis {
        doSomething()
    }
    log("main end [$time ms]")
}

suspend fun doSomething() {
    withContext(Dispatchers.IO) {
        launch {
            delay(2000)
            log("launch 2")
        }
        launch {
            delay(1000)
            log("launch 1")
        }
        log("coroutineScope")
    }
}
결과
1
2
3
4
5
[main] main start
[DefaultDispatcher-worker-1] coroutineScope
[DefaultDispatcher-worker-3] launch 1
[DefaultDispatcher-worker-3] launch 2
[main] main end [2088 ms]
[출처]
- https://en.wikipedia.org/wiki/Coroutine
- https://kotlinlang.org/docs/coroutines-basics.html
- https://play.kotlinlang.org/hands-on/Introduction%20to%20Coroutines%20and%20Channels/01_Introduction
- https://medium.com/androiddevelopers/coroutines-on-android-part-i-getting-the-background-3e0e54d20bb
- https://medium.com/androiddevelopers/coroutines-on-android-part-ii-getting-started-3bff117176dd
Comments powered by Disqus.